Are you thinking about a mega menu? There are many WordPress website builders for building mega menus in WordPress, but they also have many limitations and may not fully meet your needs. Or if you are looking for a proper guideline to build a mega menu, then you have found the right blog.
In this blog, we will use the easy way to create a WordPress mega menu and guide you through a simple yet powerful solution to create a mega menu using the Gutenberg block editor.
First, we discuss some important points related to WordPress mega menus, which will further improve your understanding of mega menus.
What is a mega menu?
A WordPress mega menu enables the presentation of menu items across several columns or rows, facilitating the organization of extensive information. Consequently, users can navigate to various sections of your website without sifting through numerous pages.
The mega menu feature allows you to add images, videos, and even tables to the menu and arrange many URLs in rows and columns.
Although menu bars can be created with WordPress, they are quite simple. The default menu can only show a few links in a flyout menu in a straight line. From a design and user experience standpoint, sophisticated site architectures are off-limits.
This can be the ideal spot if you want to add an advanced feature-based mega menu to your WordPress website. We used the Gutenberg block editor on this blog because it’s easy and user-friendly enough to build a mega menu.
WordPress Mega Menu in Gutenberg Block Editor
WordPress features a drag-and-drop builder that enables users to design various types of menus, such as drop-down menus and header menus.
Additionally, WordPress plugins like ZoloBlocks facilitate the creation of custom navigation menus within WordPress themes.
ZoloBlocks is a WordPress Gutenberg plugin with advanced blocks, dynamic content, templates, and patterns features.
If your website contains substantial pages, posts, or custom posts, consider implementing a mega menu. This option allows for multi-column dropdowns within the traditional WordPress menu layout.
You can utilize mega menus to categorize your content under distinct headings and subheadings, making it easier for visitors to locate what they need.
For instance, if you operate an online marketplace, you could organize all your product categories and subcategories within a mega menu.
In this article, we’ll guide you step-by-step through building a mega menu in WordPress using the ZoloBlocks – Gutenberg Block Editor.
Create a WordPress Mega Menu in Gutenberg
The basic Gutenberg editor or WordPress Editor does not support the creation of a mega menu. It only includes a Navigation block, which allows a simple navigation menu.
You’ll require a WordPress plugin to create a mega menu in Gutenberg. In this blog, we will utilize the ZoloBlocks block editor plugin to demonstrate how to build a WordPress mega menu using Gutenberg.
Step 1: Install a Block Editor Plugin – ZoloBlocks
Start by installing the ZoloBlocks plugin from the WordPress plugin directory. Activate it to access its advanced blocks.
- Go to plugin: Go to Plugin option and click Nieuwe plug-in toevoegen
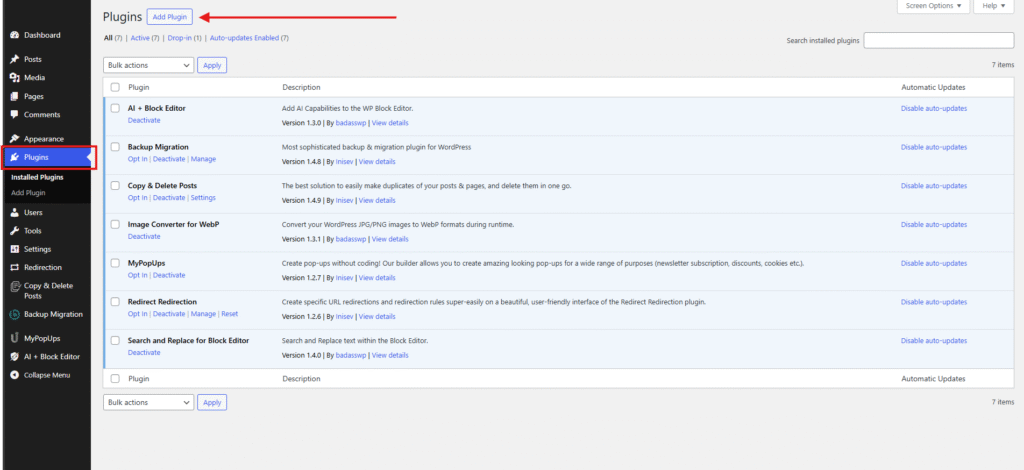
- Search for ZoloBlocks: In the search bar, type “ZoloBlocks” and locate the plugin.
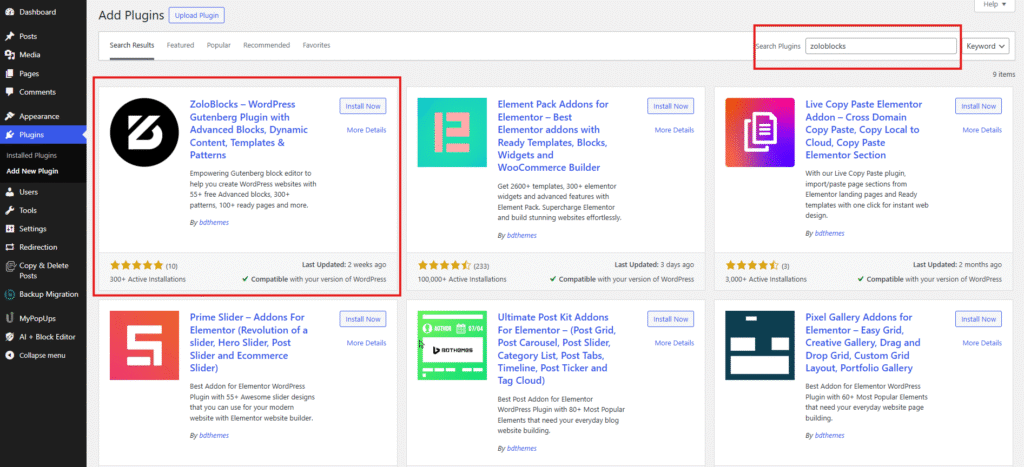
- Install the Plugin: Click “Install Now” next to the ZoloBlocks plugin.
- Activate the Plugin: Once installed, click “Activate” to enable the plugin on your site.
Enable Navigation Block
After you have installed and activated the Zoloblocks on your website, you can now turn on the Navigation Menu block from the Dashboard.
To enable the Navigation block from Zoloblocks,
- Go to WordPress Dashboard > Zoloblocks Plugin Dashboard.
- Then, Click the Blocks Tab.
- Search by the Navigation block Name.
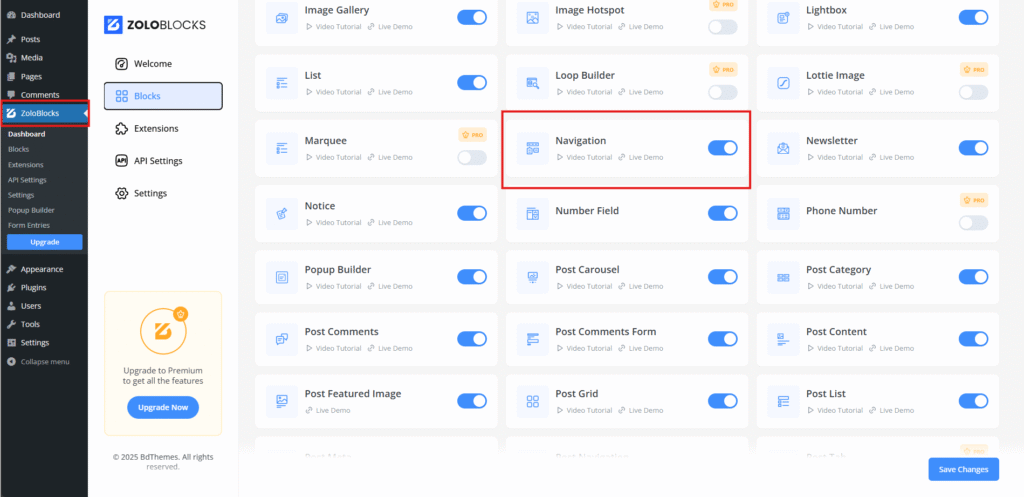
- Enable the Navigatie block.
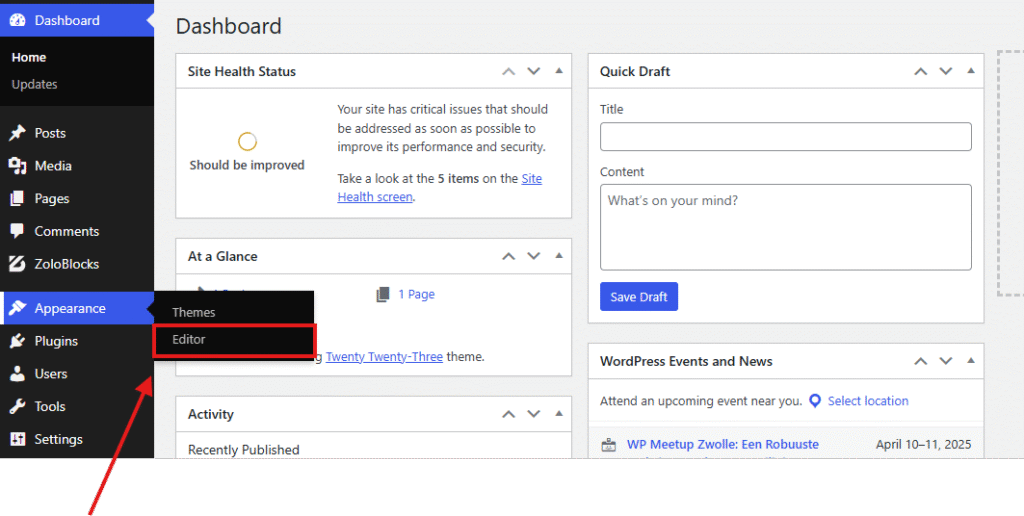
Step 2: Create a Custom Header Template
Now comes the important step. Here, you need to create a custom header for your website.
Creating a custom header template in Gutenberg is a great way to personalize your WordPress site. Here’s a step-by-step guide:
Access the Site Editor
- In your WordPress dashboard, navigate to Appearance > Editor. This will open the Full Site Editor (FSE).
Select or Create a Header Template
- Look for an existing “Header” template part or create a new one by clicking Add New and selecting “Header.” In this case, we are choosing an existing template with the Edit option.
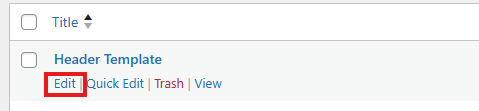
- Then, click edit
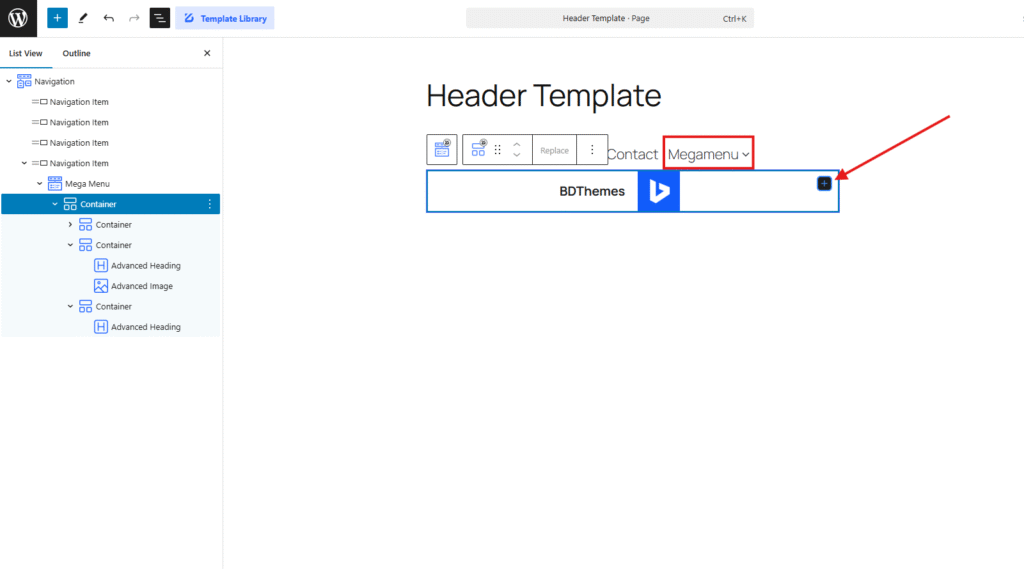
Step 3: Add Navigation Menu Block to the Header Template
Now that you’ve created your custom header, it’s time to add the Navigation Menu block to your header template.
- Click the Toggle Block Inserter icon, and a sidebar will appear on the left side. All the blocks will be visible here.
- Search by the Navigation block name
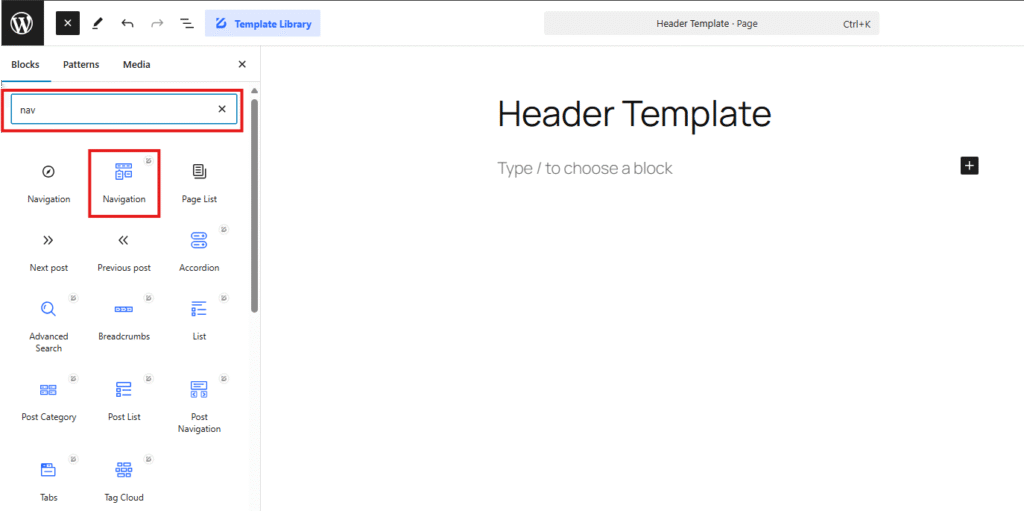
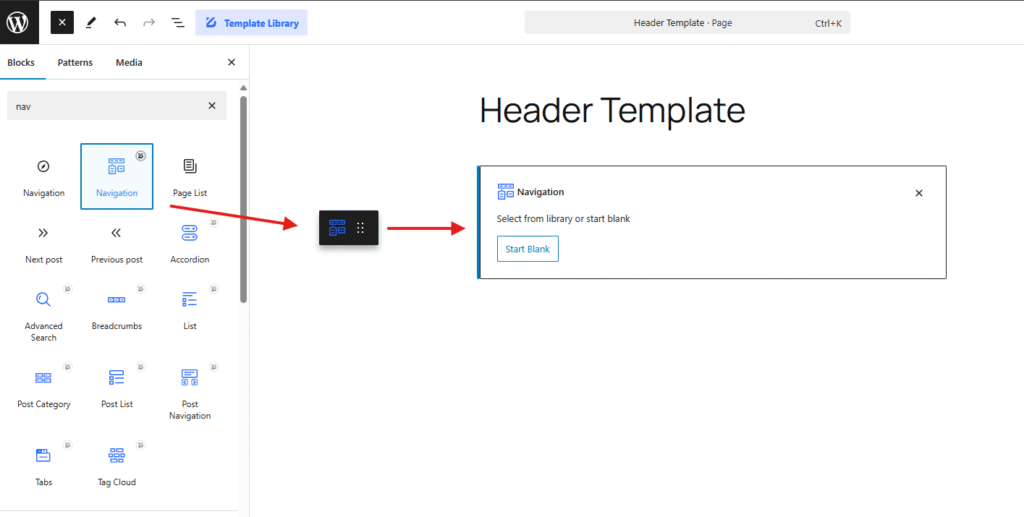
- Then select the appear blocks ( with the ZoloBlocks logo, T.R. corner)
- Drag and drop the block on the page.
- Now, click on the Document Overview button, and the Blocks list view will appear.
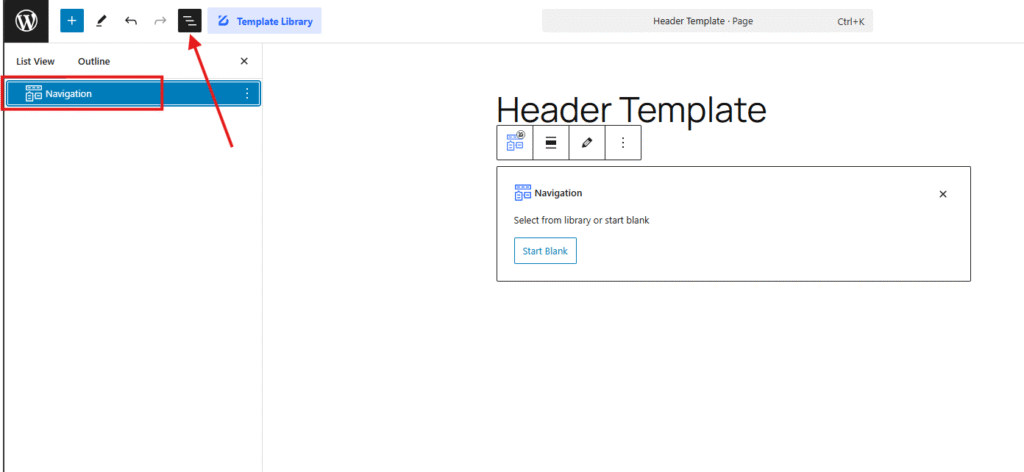
- Here appears the Navigation block.
- On the right side, click on the Block. Then, the Navigation block details appear.
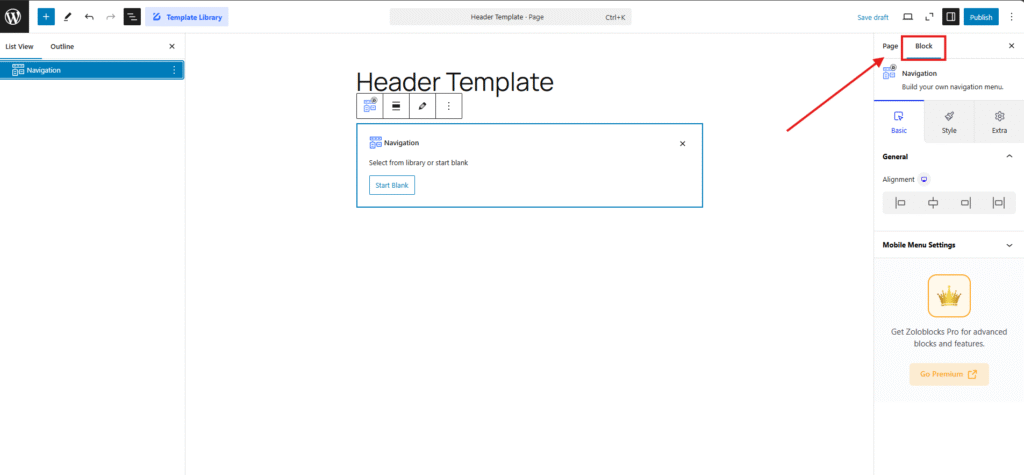
- Here are a block’s control tabs( Basic, Style, Extra ).
Step 4: Set Navigation
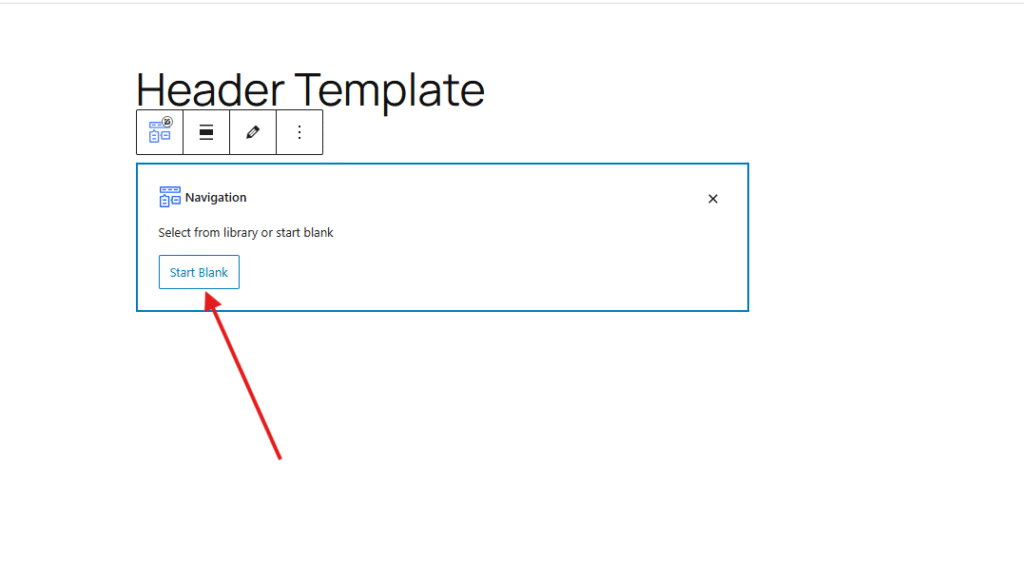
Now you need to set up the navigation menu items. There may be some default items that are already created with the theme. Here you will create some new items according to the needs of your website. To add mega menu-based items:
- Click on Start Blank
Now you need to select a variation, Here we want to build a mega menu, so
- Select the ” Items with a Mega menu ” for the mega menu items.

Step 5: Add menu items to the mega menu
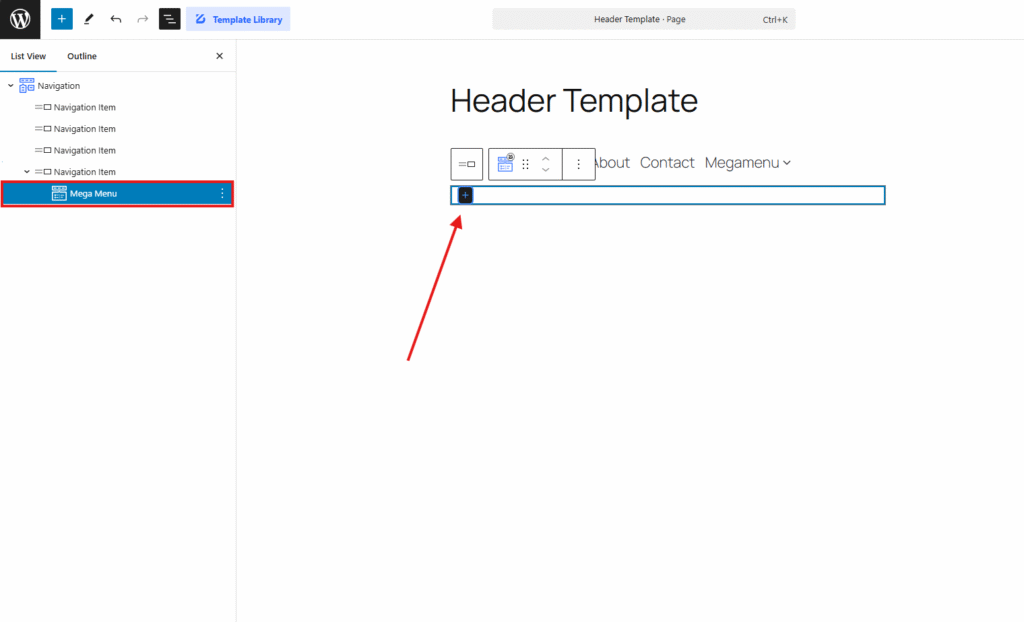
Once a mega menu navigation is created, we will now add some items under that mega menu. After adding the Mega Menu item, in the list view, the Mega Menu will appear
- Klik op de Megamenu item
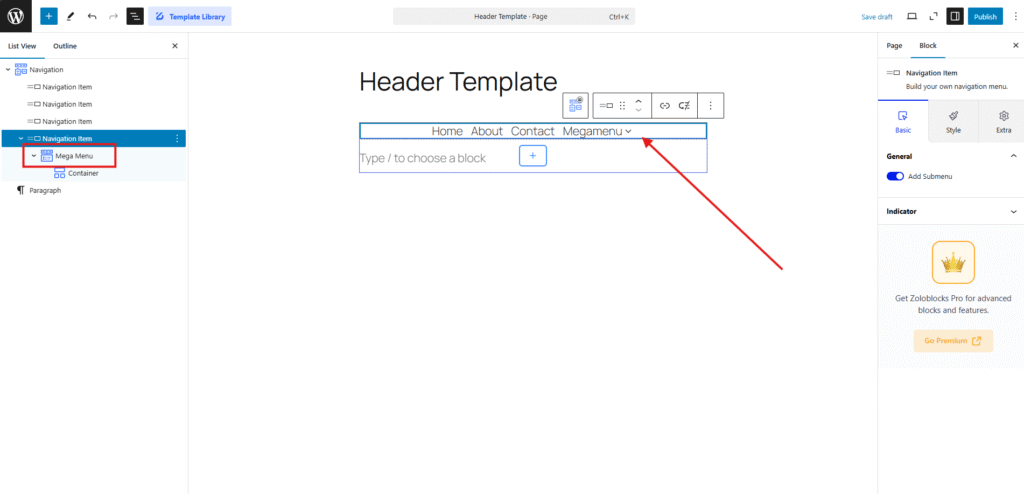
- Click on the ” + ” icon to add new items to the mega menu
Step 6: Add Container – Inner Container
Now we will add the required number of containers to hold the items we need in the mega menu.
- Search by the ”Container “
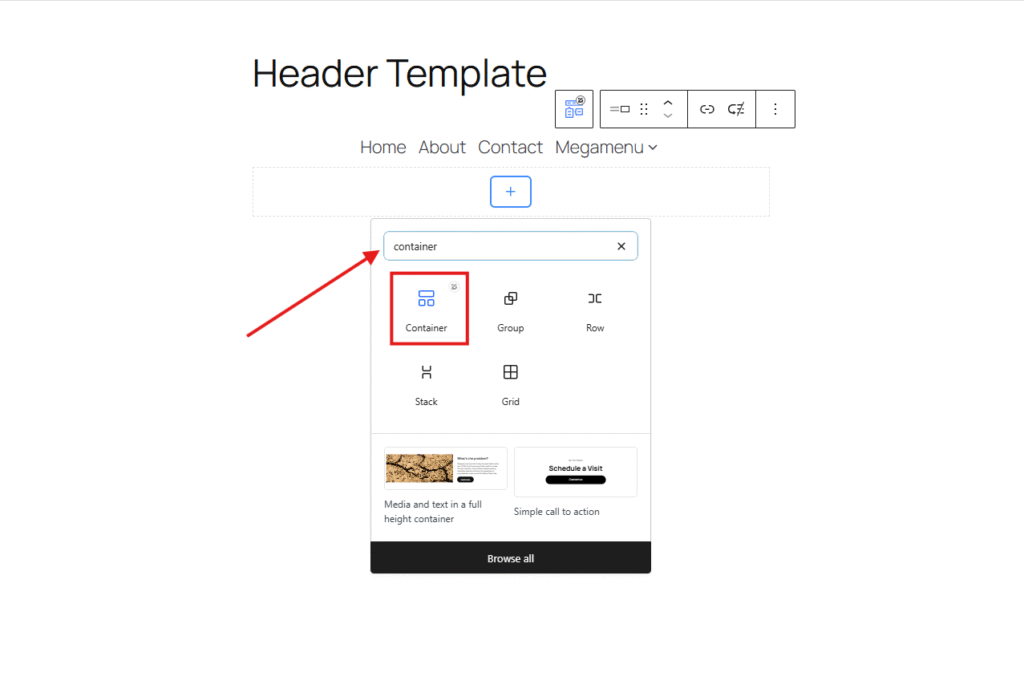
- Then select the ZoloBlocks container block
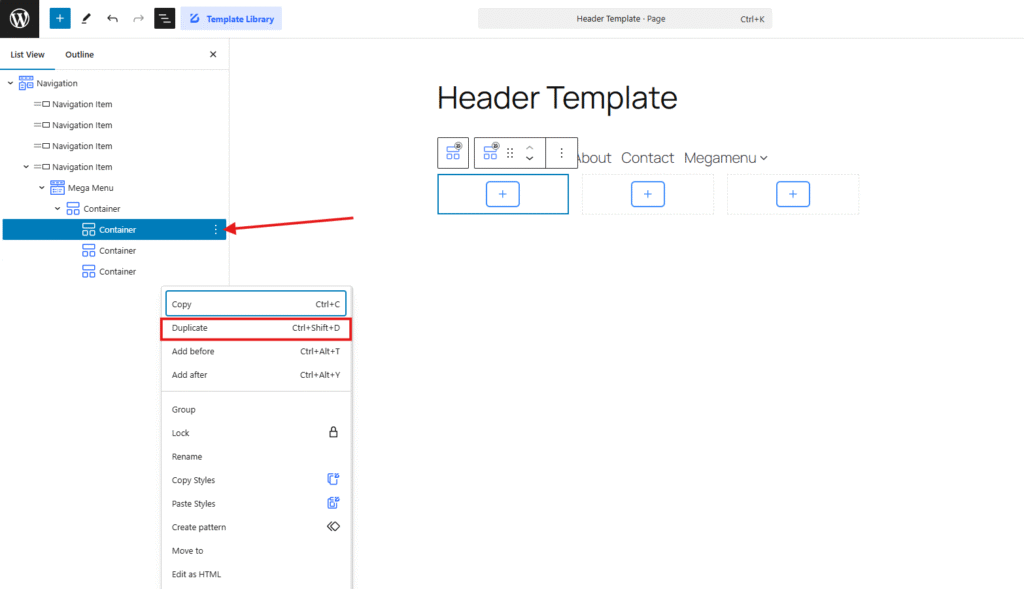
After selecting the container, make multiple sections by duplicating it.
- Select the inner container that was added, then right-click on it, and a menu will appear.
- Select the ” Duplicate ” option or press ” Tab + Command + D ” to duplicate it
Step 7: Add Content to the Inner Container
Add content or blocks to the inner container, choose any blocks from there, and make your customization.
Add Advanced Heading Block
When you want to create an item or navigation menu, you need a title or heading. Then you can use the Advanced Heading Block.
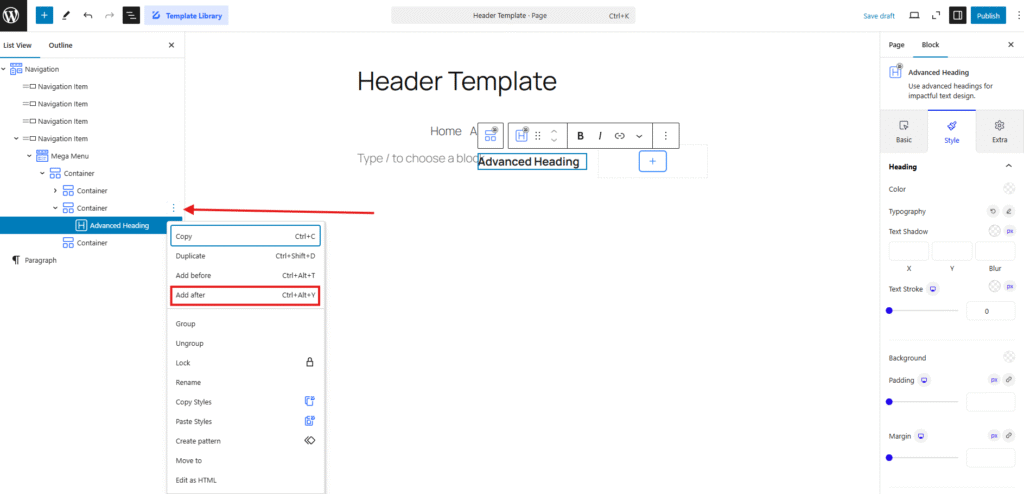
Now select the container again to add another block to it.
- Select “Container” from the list view, right-click on it, and a menu with options will appear.
- Click the “Add After” button to insert a new block following the previous one.

Now let’s add the image block right after the heading blocks.
To do that,
- Select the Container from the Block section
- Click on the ” + ” icon on the selected container
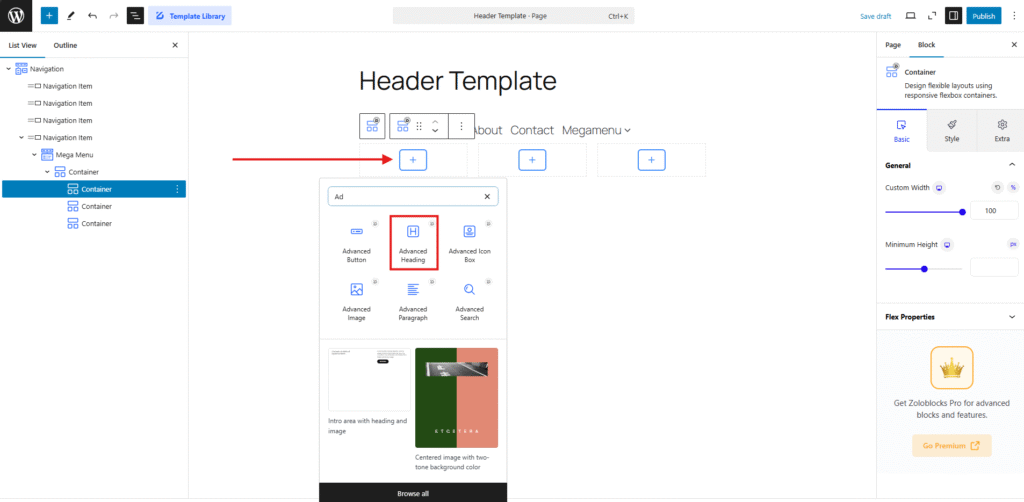
- Search by the Block name ” Advanced Heading “
- Appear the blocks and select them
Add Advanced Image Block
Now select the container again to add another block to it
- Select “Container” from the list view, right-click on it, and a menu with options will appear
- Click the “Add After” button to insert a new block following the previous one
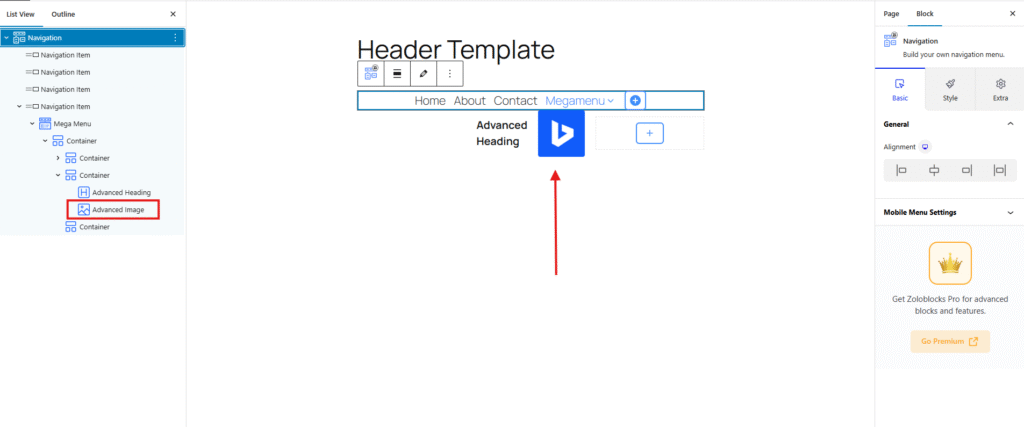
- Add Geavanceerd beeld block in new sub-container
- Add image in Geavanceerd beeld block
Add List Block
Use the List block of ZoloBlocks as the Menu item.
- In the mega menu container, click the + button to add a new block
- Select the List blocks for the list view
- The list item will be selected, and the controls will appear on the right side
- Set item name
- Enable Link to enable the list items as links
Congratulations!
Bonus: Customize Mega Menu Styles
You can now customize the appearance of the mega menu. For example, you can play around with the menu width and menu position.
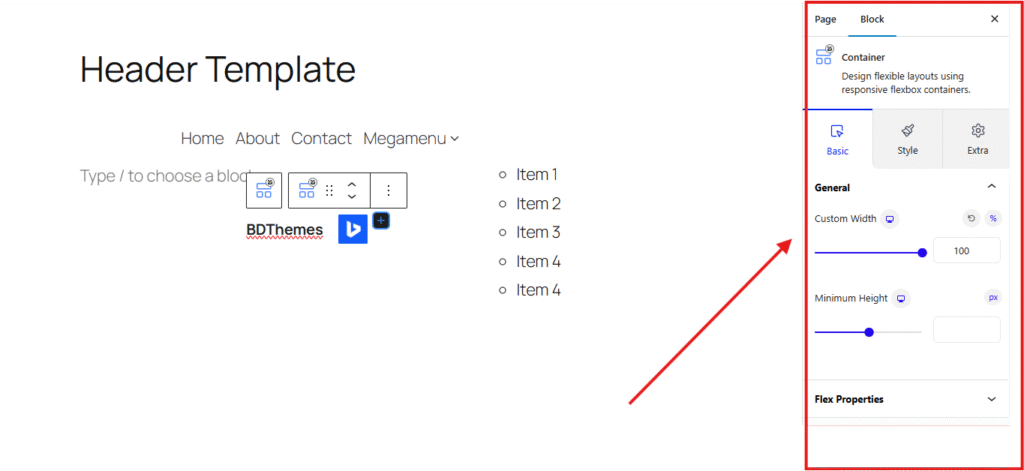
Select the Menu width to the following:
- Full Width
- Inline
- Custom
For Custom width, you can adjust the menu width manually. Then, you can set the position to align the menu to the left or the right.
You will also get Basic, Style, and Extra tabs for more custom design.
For example, from Flex properties, you can adjust alignment.
ZoloBlocks Mega Menu FAQs
1. What is the Mega Menu feature in ZoloBlocks?
The Mega Menu is an advanced menu-building feature within ZoloBlocks, allowing you to create visually appealing, multi-column dropdown menus with widgets, images, icons, and custom layouts.
2. Do I need coding skills to use the Mega Menu?
Not at all! ZoloBlocks’ Mega Menu has a user-friendly interface, so you can create stunning menus without writing a single line of code.
3. Is the Mega Menu responsive for mobile devices?
Yes, the Mega Menu is fully responsive and adjusts seamlessly to various screen sizes, ensuring a smooth navigation experience for mobile users.
4. Can I customize the Mega Menu’s design?
Absolutely! ZoloBlocks provides extensive design options like colors, typography, spacing, and layout settings, allowing you to customize the Mega Menu to fit your website’s theme.
5. What types of content can I add to the Mega Menu?
You can add a wide range of content, including text, images, icons, buttons, forms, videos, and widgets, making it a versatile tool for creating rich navigation experiences.
6. How can I access the Mega Menu feature in ZoloBlocks?
After activating ZoloBlocks, go to the WordPress dashboard. Navigate to the ZoloBlocks settings or directly to your menu settings, where the Mega Menu options will be available.
7. Does the Mega Menu affect website speed?
ZoloBlocks is optimized for performance, ensuring the Mega Menu loads quickly and doesn’t compromise your website’s speed.
8. Is documentation or support available for setting up the Mega Menu?
Yes, ZoloBlocks provides detailed documentation and customer support to help you with setup and troubleshooting.
Wrapping up
We hope this guide helps you learn how to create a WordPress mega menu using the block editor.
In this guide, we have covered a guide on creating a Mega Menu using the ZoloBlocks editor; if you want to create a more advanced featured Mega Menu with the Gutenberg editor, check out the documentation.
Please feel free to leave a comment below if you have any inquiries. Wishing you the best of luck.
If you liked this article, don’t forget to subscribe to our newsletter to get more exciting articles, news, and offers right in your inbox. Also, follow us on Facebook, Twitter, and LinkedIn to stay updated.